by Dick Dahlquist
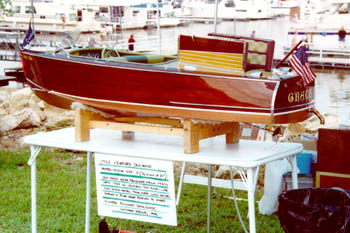
If youve been to any of our Rendezvous, you will have seen this marvelous model of the Century. It was built by Dick Dahlquist and this is his story. Thanks for sharing your experiences with us. — Editor
I tell people I have over a thousand hours into the building of “GRACE “but there’s really a lot more than that. I never set out to build what I ended up with. My oldest boy, who is now 23, and I were into radio controlled cars, racing once a week at a local track.. We’d been doing that for a few years, and I finely got tired of the level of competition. Some of those guys really took it seriously, and my eye-to-hand coordination just isn’t that good. I was considered a “road hazard.”
 I decided to get into something fun. No competition, but big enough that you could see it easily from a hundred feet or more. It’s amazing how small something looks even twenty feet away. I’ve always loved boats, and from about the age of five or six, my family spent our summer vacations on Gull Lake just north of Brained. We stayed at the same resort for the thirteen years we vacationed up there. I got to know that lake like the back of my hand, and it was there I saw lots of beautiful woodies. So, I decided to build a boat. Of course it had to be big, and I wanted a power source that would give me long run times, realistic performance, but not real fast. They race boats too and I wasn’t going to go that route again. Since everything on the market was way out of my budget, I determined this would have to be a home-built project. Sterling Models makes a kit of the Century Sea Maid. It’s only 27 inches long, but I picked one up quite cheap, and since I only wanted the kit to use as a guide to build a larger one, I chose it.
That was the start. Now at that point, all I planned to do was scale up the lines taken from the kit to 1/4 the size of a real boat, then throw something together quick and dirty and just play with it. But as you’ve seen, it didn’t quite turn out that way. I guess the project started to take on a life of its own when I made the decision to use a gas motor that would be completely contained in the engine compartment, and be able to run with the hatches closed. This required the motor to be water-cooled. Around this time, my supervisor brought in a couple of chain saws for me that had seen better days. He had given me a weed whip motor about a year earlier that I rebuilt and had planned to use in this project. My imagination took off when I saw that these motors had a profile much more suited to the boat, and a head shape that I could easily put a water jacket around. I figured it only made sense that the boat should have a working transmission with forward-neutral-reverse. Now things were getting interesting, but I was still thinking quick and dirty for the boat itself
Now bear in mind, I had no idea at this point how the real boats were built. Putting a water jacket on the motor, making a water cooled exhaust manifold, and building the transmission were all within my capabilities as a machinist. But the wood work was something I had never tried before, especially on a project of this scope.
I finished the patterns for the keel and frames, and went around to all the hobby shops looking for model aircraft plywood. The keel and frames started coming together and I decided to use door veneer material for the outside. One day, while out looking for more plywood, I saw a 54 inch model of the Sea Maid at Funtime Hobbies down in Burnsville. Wow, was that a high to see one about the same size I was building. The fellow who built it had planked it and made all of his fittings out of wood and painted them silver. He was there that day so I was able to talk to him about his, and he explained how the real ones were built. I didn’t much like his fittings or the way he covered the screw holes in the planks with putty but it was a nice looking boat.
The more I thought about his, the more my imagination worked. While his looked nice, I thought how much better it could be with metal fittings and no putty on the screw holes. So the decision was made, it would be planked, have metal fittings, and no screw holes to putty. But those screw holes were a problem. How would I fasten the planks? Should I just glue them to the frames or maybe nail them? Then I vaguely remembered the many “round dots” on those old woodies. Plugs, of course! But would I be able to do that with a boat this size? I needed some plank material to experiment with.
I don’t remember why I chose mahogany for the planking, but I did. I ended up at Elmos Lumber in Lake Elmo and picked up a large board with a nice grain. Then I learned about re-sawing large stock into rough planks. While this was going on, I was looking all over town for small brass wood screws. The smallest I could get were a number 2, which was a little big, but would have to do. After some experiments with plank thickness, I found 3/16 to work well. It left enough material so the screw wouldn’t pull through and a deep enough counter bore for a plug. I was working on the fittings while doing the frames and plank experiments. I didn’t want to end up with a finished boat and no fittings, so I tried to work a little on every aspect hoping everything would be done at the same time. Then I thought it would be nice to see a real Sea Maid. I went around to the local marinas and quickly learned that old wood boats are few and far between. A guy at one marina told me about a place in old Cottage Grove where a fellow keeps a lot of old boats. Turned out, its only a mile from where I live. Well, he had (and still has) a lot of old woodies. To me, they looked like fire wood, but after talking with him awhile, I came away enlightened about the restoration process. He also showed me his set of Bob Speltzs books and said I should be able to get them from the library. He wouldn’t entertain the idea of my borrowing his. The library only had volume one but that’s all it took; I had to have my own copy. I called Bob, wondering if the number he had in the book was even any good. Bob’s mom answered, and I asked for Bob. In speaking with him, I’m still impressed with the way he made me feel like an old friend, and his genuine interest and encouragement in my project. I ordered his first book and he invited me to come to the toy boat show that next spring. I told him mine wouldn’t be done by then, but he said to bring it anyway; the guys would love to see it. He sent my book right away without even waiting for my check — now that said volumes about him. Two months later, I called Bob again to order volume two and to reserve a table at the toy boat show.
I had really looked forward to meeting Bob that April, but it wasn’t to be. I called him again in February to add my family to the dinner reservations, and Angie told me that Bob had passed away two weeks before. They still held the show and I had a wonderful time. The people were great; Todd Warner, Paul Mikkelson, Bill Arick, Don Larson, Lee Wangstad, Don Lindstrom and many others whose names I can’t remember. I guess that’s when I decided to make the boat the best I could.
Later that year, Todd Warner was kind enough to put me in contact with the owner of a Sea Maid who lives on Lake Minnetonka. I spent a Saturday afternoon at his home taking pictures and measuring all the fittings on his boat. It was great to see a real Sea Maid. I was awe struck for the first hour; I just walked around it, admiring it. That was 1993. I attended the toy boat show each year thereafter except the year they held it in St. Louis. Each year, the guys looked to see if I had finished my boat, and if not, how much further along it was from the year before. Finally in 1996, 1 declared it finished although there was quite a bit of tweaking that took place after that.
I had started in the fall of 1991 and finished in the spring of 1996. It was a real growing experience for me. I stretched my abilities in many areas.1 learned about planking all the way from re-sawing rough lumber, to plank stock of the correct size. Then there was steam- bending and building a steam box. Finding a source for wood screws and stainless steel screws as small as a size 0. There were many trial and error endeavors I went through to get the fittings, and especially the upholstery, to look real. Some things just don’t scale down well. Sometimes the size in a scaled-down version looks out of proportion – either too big or too small. Then you have to adjust it so its pleasing to the eye. Some materials like the upholstery are too heavy to look realistic if used as is, and so I had to grind the backing off to achieve a realistic look and feel. I had to find a way around sewing because I’m not a sewer, and I didn’t think the stitching our machine did was small enough to look real. So all the seams are glued as well as the beading. This presented quite a problem as most glues dry hard and non-pliable. Polishing all the fittings was another learning curve. I didn’t want the extra expense of plating so all the fittings are ether aluminum or stainless steel polished to a chrome like finish. Boy is that a slow, dirty job. My whole workshop was covered with a greasy film, some of it still is.
The emblem that Century used on the transom required the most time of all the fittings. I machined all the fittings from solid stock, so each piece was made individually and not cast from a mold. Since that stem emblem has Century written in script, I had to build a program for a CNC machine to cut it from a piece of aluminum. I’d say I have a couple hundred hours in that part alone. The plus side of that is I was able to use the same program for the Century in the step pads and the logo on the side of the hull. I also had quite a bit of time into making hinges. I looked everywhere to find a source for small hinges that would be long enough — no such luck. So I was in the hinge business — made them three times before I got it right.
We can’t forget the boat itself. Although I have to admit, it really went quite easily. All the planks fit nice and tight, the glue I used didn’t leave little circles around the plugs or along the seams. I bleached the whole boat to have a uniform color when I stained it, and for the blond areas on the deck. I’ve since learned it should have been a special type of wood. The finial finish took a lot longer than it should have. I didn’t know then that you had to wait for your finish to get hard before you can rub it out, so after a couple of weeks of rubbing and rubbing, it suddenly started to polish up. Then the little light comes on in my head — you have to wait till it gets hard before polishing.
This whole story is the condensed version. There’s so much more detail I could add but I think you get the picture. Besides all the above, I’m married and have three children, one who was about sixteen when I started. It was quite a juggling act those four years.
Which brings me to the name: “GRACE.” I chose grace because of Gods grace. For by His grace we are saved, and all that we are, our talents and abilities are gifts from Him. I could think of no better way to honor Him, for giving me the ability and time to complete my project.
I’ll see you at Treasure Island in August.