by Jerry Petersen (Part 4)
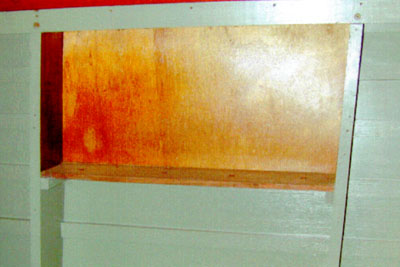
 I continue to wind my way through the total restoration of Swinging Shepherd, my 24 foot, 1954 Shepherd hardtop cruiser. Recently, I have focused on the mystique of the Shepherd glove box. I had seen interior covering board oval glove boxes on smaller Shepherds, but my 24 foot cruiser appeared to have left the factory without this convenience. However, to my surprise, when I removed the aft interior covering boards, I found that there were indeed originally glove boxes on both sides of the back bench seat. They had been covered over by replacement covering boards. Figure 1 shows the factory framing of one of these boxes. I immediately decided that my new covering boards would have the traditional Shepherd tear-drop oval openings to access these boxes! I also decided that I would make similar glove boxes for the front row of seats. If it were not for the crank down windows amidships, I would have done the same for the second row of seats.
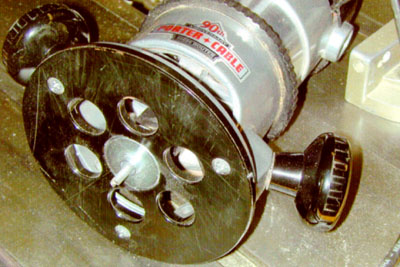
 Last August, I measured the tear drop openings in one of the smaller Shepherds at the Rendevous. The Shepherd tear-drop shape consists of a four inch circle aft connected to a three inch circle forward. I decided the best way to cut the opening in my new covering boards was to use my router with a thimble guide installed. Figure 2 shows my router with the cutter and thimble installed. The next step was to make a template to guide the router. I did this using half inch stock and an adjustable circle cutter in my drill press to make the end circles. The circles were then connected using a straight edge guide and my hand held jig saw. I finished the template by hand sanding the interior edges to get smooth straight lines between the circles.
 I am using 6 mil Okoume mahogany, marine grade plywood (made in Greece) for the new covering boards. The relatively thin 6 mil thickness is needed to permit the boards to be bent to match the curves of the hull. However, I didnt want a 6 mil edge on the oval openings. Hence, I bonded a second piece of Okoume over the area in which I planned to cut the oval openings. Figure 3 shows this extra piece of Okoume pressed in place on top of my table saw while the bonding West System epoxy cured. Figure 4 shows the template in place for the cut, and Figure 5 shows the opening after the cut. I then used my router, and a 1/8 inch round over bit, to ease both the outside and inside edges of the opening. The remaining task for the front boxes was framing the interior with 6 mil Okoume. Figure 6
  shows the frame strips installed for the port side box, and Figure 7 shows the box with all the interior Okoume in place.
Overall, my restoration progress has been slowed by spring landscaping jobs and hot weather, since my shop is not the most comfortable place to enjoy 90 degree summer days. However, as weather permits, I am returning to my task list. To date, I have: made and installed new transom frames, repaired most of the other frames and both chines, replaced a dozen side planks, fitted sealed and installed new floor boards, treated all of the interior to three coats of fresh bilge paint, fitted a new GPS antenna to the hard top and refinished the hard tops interior with three coats of white gloss marine paint.
 My critical path now includes staining and refinishing the dash so that the instruments can be re-installed and re-wiring initiated. I dont want to put my new transom planks on until rewiring is complete, since the engine compartment is much easier to access with the planks off. Once the rewiring is complete, the transom planks will be installed and the
exterior refinished. I plan to stain and varnish the interior covering boards and seat supports out of the boat. Covering new stainless, or chrome plated brass, screws with varnish just doesnt make any sense. I have the seats back from the upholsterer with pleated dark green leather-type fabric installed, and a roll of matching marbleized battleship linoleum on hand for the floor. I plan to use 1 ½ inch wide mirror surface stainless steel strips to cover the cracks between in the floor panels, and install lifting rings in the four panels that can be readily removed. The strips will be secured on the removable panel edges with oval head stainless screws. This worked  well on my GarWood utility, and will allow the bilge to be much more accessible than with the carpet covering that was in the boat.
With a little luck, Ill have the finished boat at the 2003 Rendevous. I also plan to take it to the ACBS Annual Meeting in Ottawa, Canada in September, 2003, and participate in the related Ottawa River Cruise. I had the joy of doing that cruise on a friends boat a few years ago when the Annual Meeting was at Muskoka. The Ottawa River is truly spectacular with mountains coming right to the waters edge. I cant wait to cruise it in the totally restored Swingin Shepherd!


